What better way to celebrate the change of weather (especially in the Alabama heat) than with some tasty, braces-approved and foodie-approved fall recipes?
If you’re going through orthodontic treatment, you know eating with braces requires some caution. To prevent damage to your brackets or wires, it’s best to avoid any food that’s especially sticky, hard or chewy until your braces are off and your new smile is revealed.
But that doesn’t mean you can’t enjoy some seasonal foods! It just means you can branch out and try some different recipes that won’t require a braces repair. You never know which recipe could become your new favorite.
Check out these delicious, fall-inspired recipes from your favorite team here at Just for Grins Orthodontics to kick off the season.
Slow-Cooker Potato Soup (Recipe by Kellie Kelley)

Ingredients:
- 6 slices bacon, chopped
- 2 lb. russet potatoes, peeled and cubed
- 3 celery stalks, sliced
- 1 large leek, cleaned and chopped
- 3 garlic cloves, finely chopped
- 4 c. chicken stock
- 1 tsp. kosher salt
- 6 sprigs of fresh thyme
- 1/2 tsp. ground black pepper
- 3/4 c. sour cream, plus more for garnish
- To serve: Shredded cheddar cheese, chopped chives, sour cream, reserved bacon
Directions:
- Heat a large skillet over medium heat. Add the bacon strips and cook until golden brown, 6-8 minutes.
- Remove to a paper towel lined plate. Reserve 2 pieces for garnish and crumble the remaining 4 pieces.
- Place the crumbled bacon, potatoes, celery, leek, garlic, stock, salt, thyme sprigs, and pepper in the base of a 6- to 8-quart slow cooker. Put the lid on the slow cooker, and cook on high for 4 hours (or low for 6 to 8 hours) until the potatoes are tender when pierced with a fork.
- Remove the thyme sprigs and discard.
- Use an immersion blender to blend the soup to a semi-smooth consistency, leaving small chunks of potato and vegetables for texture.
- Stir in the sour cream. (Add 1/4 – 1/2 cup of water, to thin the soup out to your desired consistency).
- Serve in bowls, garnished with cheese, chives, additional sour cream, and the reserved bacon slices crumbled over top.
- Enjoy!
Pumpkin Fudge (Delish Recipe)
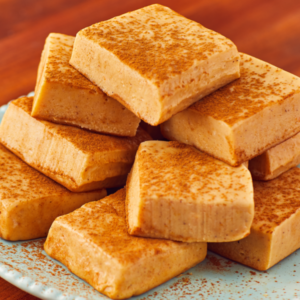
Fudge ingredients:
- 3.5 cups of white chocolate chips
- 1 (14-oz.) can sweetened condensed milk
- 1/3 cup pumpkin purée
- 1 teaspoon pumpkin spice, plus a little more for dusting (optional)
- 1/2 teaspoon pure vanilla extract
- A pinch of kosher salt
Instructions:
- Line an 8”-x-8” pan with parchment paper and grease with nonstick cooking spray.
- In a large microwave safe bowl, combine white chocolate and sweetened condensed milk. Microwave on medium power for 1 minute intervals, stirring after each minute, until smooth.
- Fold in pumpkin purée, pumpkin spice, vanilla, and salt until smooth.
- Pour into the prepared baking pan and place in the refrigerator for 3 hours, or until the fudge is set.
- Sprinkle with more pumpkin spice, cut into squares, and enjoy!
Home-Made Apple Pie (Recipe by Erin Merhar)
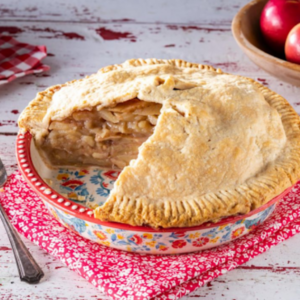
Ingredients for the pie crust:
- 2 1/2 c. all-purpose flour, plus more for dusting
- 1 tsp. kosher salt
- 1 c. cold, unsalted butter (cubed)
- 6 tbsp. very cold water
- 1 tbsp. apple cider vinegar
Ingredients for the apple pie filling:
- 8 large apples, such as Granny Smith or McIntosh (about 4 pounds total), peeled and thinly sliced
- 1/2 c. granulated sugar
- 1/4 c. all-purpose flour
- 1 tsp. ground cinnamon
- 1/4 tsp. kosher salt
- 2 tbsp. unsalted butter, cut into small pieces
- 1 tbsp. heavy cream
Directions:
- For the pie crust: In a large bowl, whisk together the flour and salt.
- With a pastry cutter, gradually cut the cold butter into the flour until pea-sized pieces form.
- In a small bowl, combine the cold water and apple cider vinegar.
- Add the vinegar mixture to the flour/butter mixture 1 tablespoon at a time, mixing gently in between each addition. Stir together until all of the ingredients are incorporated and the mixture holds together when pinched with your fingers.
- Turn the mixture out onto a clean countertop and knead 4 to 5 times until combined.
- Divide the dough into two evenly sized balls and flatten each to a disk shape, about 1/2-inch thick (with minimal cracks). Wrap with plastic wrap and refrigerate for 2 hours (or up to 2 days).
- Remove one disk of pie crust from the refrigerator and let it temper for 20 minutes until it is soft enough to roll.
- Roll the pie dough into a 13-inch round on a lightly floured surface. Transfer the crust to a 9-inch deep dish pie plate and trim any overhang to ½-inch. Refrigerate for 20 minutes, while you prep the filling.
- Preheat the oven to 425˚ and place a baking sheet on the bottom rack.
- For the apple pie filling: In a large bowl combine the sliced apples, sugar, flour, cinnamon and salt. Mix well. Add the filling into the chilled pie crust, arranging the apples tightly together so that there is little space in between. Top with the butter pieces.
- Roll out the remaining disk of dough on a floured surface into a 13-inch round. Carefully lay the dough over the filling, fold the overhanging dough under the overhang from the bottom crust, and crimp the edges of the crust using a fork.
- Cut a few 1-inch slits in the top crust (to release the steam). Brush the top of the pie with heavy cream.
- Place the pie on the preheated baking sheet and bake for 15 minutes. Reduce the heat to 350˚ and bake, rotating halfway through, until the filling is bubbly and the crust is golden brown, 50 to 60 more minutes.
- Transfer to a rack and let cool about 2 hours before slicing.
Enjoy!
Try out one of these recipes. Or try all three recipes in one night… No one’s judging. Carve out some family time and enjoy any of these fall recipes with your loved ones!
Clean teeth reminder: Don’t forget to brush and floss your teeth after eating sweets. It’s important that you clean your teeth and braces thoroughly to prevent bacteria from building up between your teeth, and around your brackets or wires. Excessive sugar can also wear down your enamel, and your enamel is essential for maintaining strong teeth.
Please don’t hesitate to reach out to us with any questions about you or your child’s treatment! We’re here to guide you through your treatment process, from your very first visit, to your last appointment.
If you’re looking for a top orthodontist in Montgomery, Millbrook or Wetumpka, we’d love to meet you! Request a complimentary exam for you or your child today.